مکس کیو دی ای (Maxqda)
موارد بهینه سازی شده از رابط کاربری در نرم افزار مکس کیو دی ای (Maxqda) :
الف) قابلیت تنظیم طول و عرض هر پنجره
نمایش بهینه پنجره های مکس کیو دی ای (Maxqda) تا حدود زیادی به اندازه مانیتور شما و تنظیمات resolution بستگی دارد.
توصیه می شود از وضوح تصویر (resolution) کوچکتر از ۱۰۲۴ در ۷۶۸ استفاده ننمایید.
اندازه هر پنجره در مقایسه با دیگر پنجره ها را می توانید به اندازه دلخواهتان با موس تغییر دهید.
ب) سفارشی کردن ستون های کدگذاری
پنجره «مرورگر سند» دربرگیرنده ستون کدگذاری است، ناحیه ای خاکستری در سمت چپ سند متنی که در آن کد نمایش داده می شود .برای تنظیم عرض ستون کدگذاری، از اشاره گر موس مانند تغییر سایز در دیگر برنامه های ویندوزی استفاده کنید.
تنظیم عرض ستون کدگذاری
شما می توانید با کلیک کردن بر روی قسمت خالی در ستون کدگذاری و راست کلیک کردن، نمایش یا عدم نمایش نام هر کد را تعیین کنید. در پنجره جدید ظاهر شده شما می توانید تنظیمات دلخواه خود را وارد کنید.
ج) چیدمان دو ستونه و سه ستونه
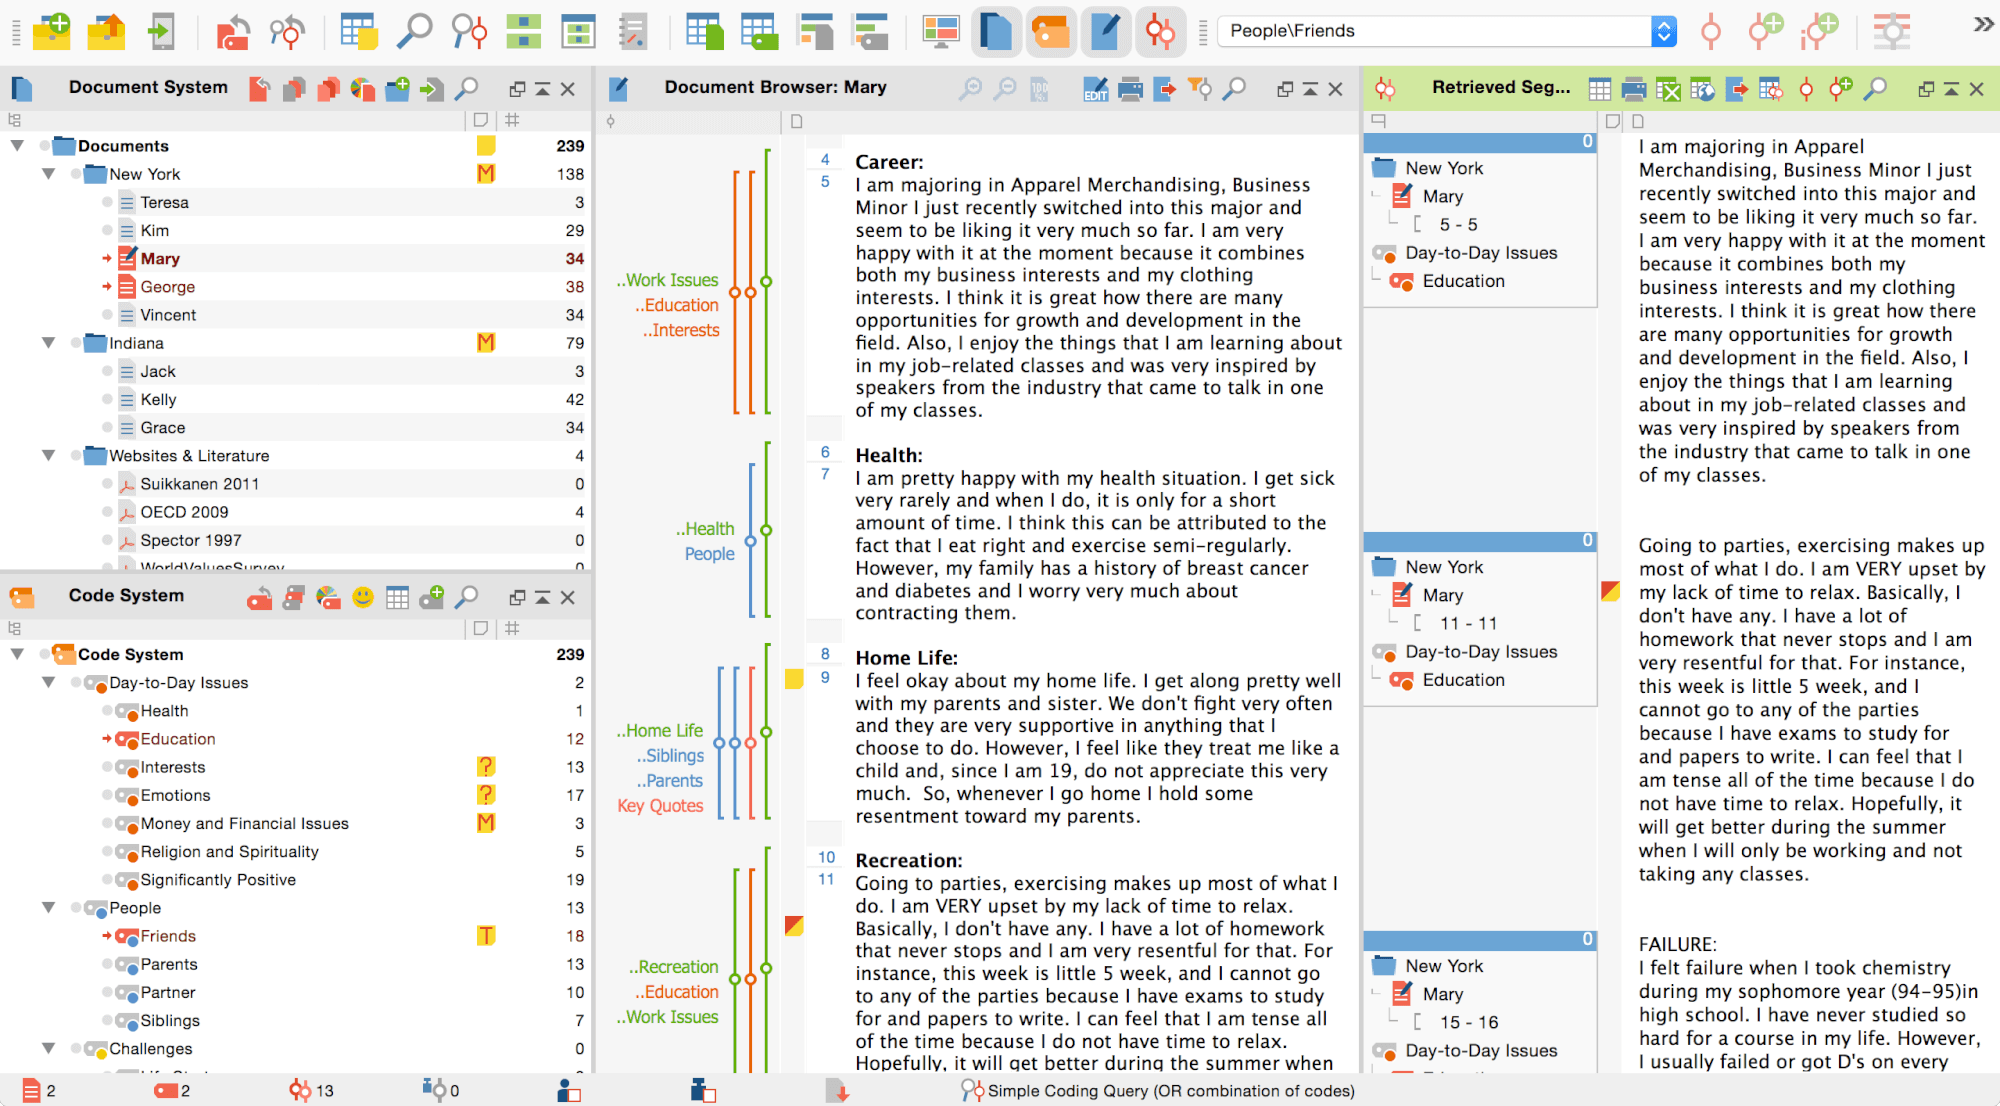
به طور پیش فرض، نرم افزار MAXQDA از یک طرح بندی سه ستونه بهره می برد. چیدمان سه ستونه از قالب صفحه پهن نمایشگرهای مدرن نسبت به چینش سنتی چهار پنجره ای (دو ستونه)، که مدت زیادی است که یکی از خصوصیات مکس کیو دی ای (Maxqda) بوده، به نحو بهتری سود می برد. شما به راحتی می توانید از طریق بخش «مدیریت طرح بندی (چینش) صفحه» به نمای دو ستونه سنتی بازگردید. طرح بندی دو ستونه برای صفحه نمایش با قالب های عادی مناسب است.
دسترسی به «مدیریت طرح بندی صفحه»
۱ . در منوی window > Screen-Layout-Manager
۲ . آیکون ![]() در نوارابزار اصلی.
در نوارابزار اصلی.
مدیریت طرح بندی صفحه این امکان را فراهم می سازد تا گزینه ای را از میان چهار گزینه زیرانتخاب کنید:
مدیریت طرح بندی صفحه
طرح اول (بالا سمت چپ): طرح پیش فرض جدید در سه ستون . «مرورگر سند» در وسط و «بخش بازیابی شده» در ستون سوم در سمت راست صفحه قرار دارد.
طرح دوم (سمت راست بالا): طرح سه ستونه جایگزین با قرار گرفتن «سیستم اسناد» و «سیستم کد» در سمت راست صفحه نمایش.
طرح سوم (پایین سمت چپ): طرح دو ستونه کلاسیک با قرار گرفتن «سیستم اسناد» و «سیستم کد» در سمت چپ.
طرح چهارم (پایین سمت راست): طرح دو ستونه جایگزین با قرار گرفتن «سیستم اسناد» و «سیستم کد» در سمت راست.
توجه: برای صفحه نمایش با عرض کمتر از ۱۲۸۰ پیکسل، نرم افزار MAXQDA به صورت پیش فرض با طرح دو ستونه به نمایش در می آید.
د) صفحه نمایش کوچک
به هنگام کدگذاری یک سند، گاهی اوقات بستن پنجره «سیستم اسناد» و «بخش های بازیابی شده» مفید واقع خواهد شد زیرا پنجره «سیستم کد» و «مرورگر سند» به صورت بزرگتر به نمایش در خواهند آمد.
حتی می توان با کشیدن حاشیه پنجره «مرورگر سند» در جهت پنجره «سیستم کد»، ناحیه «مرورگر سند» را بزرگتر کرد.
قالب بهینه پنجره ها در زمان کدگذاری
به طور مشابه، بستن پنجره «مرورگر سند» به هنگام انجام عمل بازیابی (پرس و جوی کدگذاری) مفید خواهد بود، بنابراین شما به سه پنجره لازمه دسترسی خواهید داشت در حالی که پنجره «بخش های بازیابی شده» با حداکثر اندازه ممکن به نمایش در خواهد آمد. هرگاه شما در پنجره «بخش های بازیابی شده» بر روی جعبه اطلاعات متن کلیک کنید، متن مربوطه در پنجره «مرورگر سند» باز خواهد شد.
برگرفته شده از سایت مکس کیو دی ای (Maxqda)
Experienced users will immediately recognize that MAXQDA comes with beautiful new interface, colorful and sharp icons and a new window design that is modern and fresh. The new interface looks absolutely identical on Windows and Mac computers, making it easy to switch between the two systems or to teach classes on either system.
Click to enlarge
Keeping MAXQDAs well-known architecture
If you have worked with older versions of MAXQDA, you don’t need to learn anything new. Every element of the user interface has been updated, but the layout and menu structures have stayed just the same. All of your favorite tools can still be found in the same menu bars, partly accompanied by MAXQDA 12’s new options for your analysis.
The new icons draw their inspiration from the old user interface icons so they are easy to identify. Some of the icons have been updated to be more intuitive and logical, but the majority very closely resembles the old icon images.

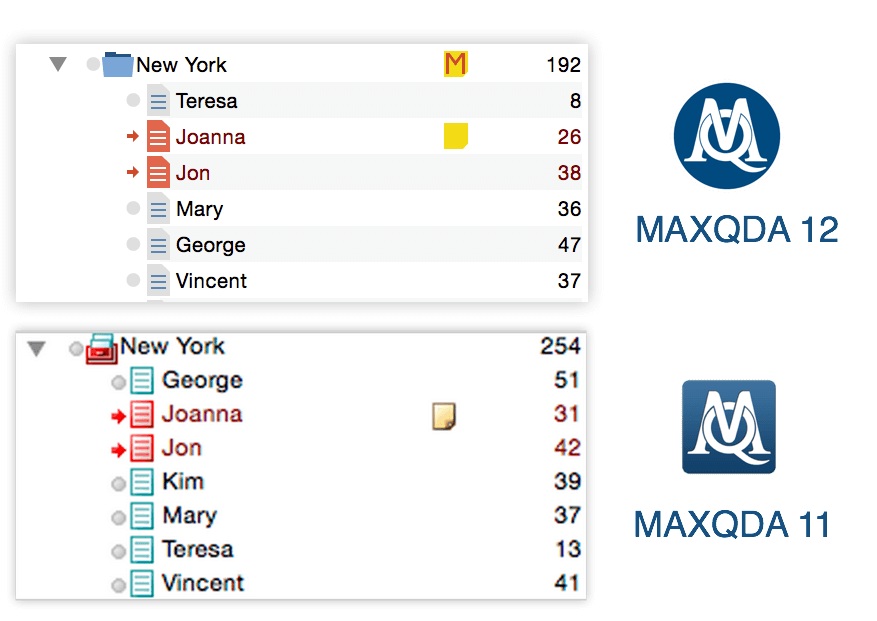
Compare MAXQDA 12 to MAXQDA 11: Main Toolbar
Identical on Windows and Mac OS X

No matter if you wish to use MAXQDA on Windows or Mac OS X systems, the user interface is absolutely identical. This does not only makes it easy to transition from one platform to the other, but it also proves valuable in teaching situations: no matter which of the operating systems you present MAXQDA on, your students will be able to follow!
This is why you won’t find special tutorials or manuals for MAXQDA for Windows and MAXQDA for Mac on our webpage. Everything you learn or teach about MAXQDA can be used on either platform just the same.
Optimized for high-resolution and retina displays
Compare these two images on a high-resolution display.
MAXQDA 12 looks beautiful and sharp while MAXQDA 11 is a little fuzzy.
A lot of our users have upgraded their technology and are now working with high-resolution, 4K or retina displays. These displays are four times as big as “old” HD displays, which challenges software developers all around the world to upgrade their software to work on bigger screens.
With MAXQDA 12 we upgraded each element of the user interface to look stunning and sharp on large displays, as well as on small notebooks.
Edit-Mode and Document Navigation in Document Browser
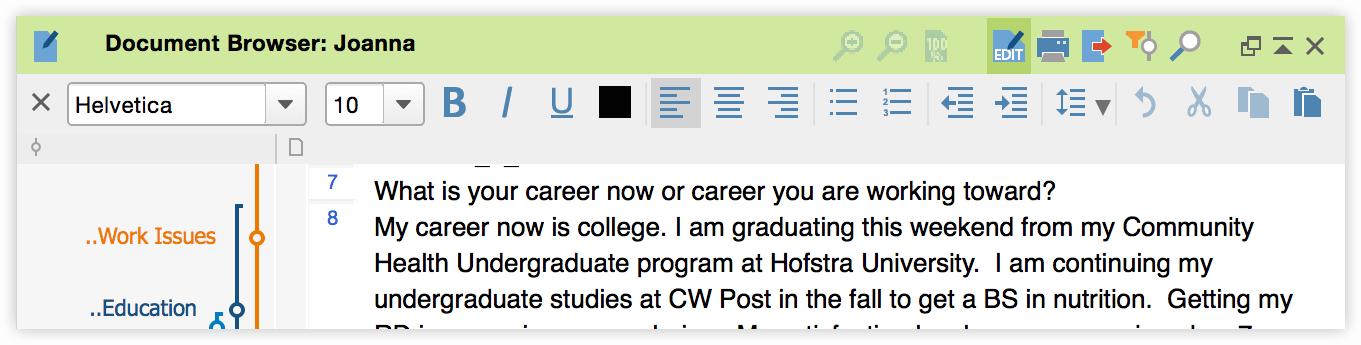
The location of the edit mode and document navigation and zoom option have been greatly improved. In older versions the both functionalities were located in toolbars at the top of the MAXQDA window, which some users found hard to find. We have moved both functionalities into the window where they are used by placing the icons into the document browser window instead.
When you activate the edit mode all of the text formatting options are also displayed at the top of your document, making them easier and quicker to use while editing a document. Close the formatting toolbar to switch off the edit mode again.
دیدگاهتان را بنویسید